

Creating Calm at Home: Simple Design Changes That Make a Big Difference
If your home feels cluttered, awkward, or just a little “off,” small design adjustments can make a surprising difference. In this post, we’re sharing simple changes—from furniture layout and lighting to artwork placement and visual clutter—that can help bring calm, comfort, and cohesion back into your space.
Why your home may not feel quite right, and the small fixes that can transform it.
Sometimes a home doesn’t feel quite right.
You walk into a room and something feels off—maybe it feels cluttered, awkward, unfinished, or just a little chaotic. Yet you can’t always pinpoint why you don’t feel the ease in your space that you would like.
The good news? Most of the time, the things that keep us from loving our spaces are surprisingly simple to fix. With just a few thoughtful adjustments, you can transform your home into a place that feels calmer, more cohesive, and welcoming at the end of a long day.
Here are a few common design issues I often see—and easy ways you can refresh your space.
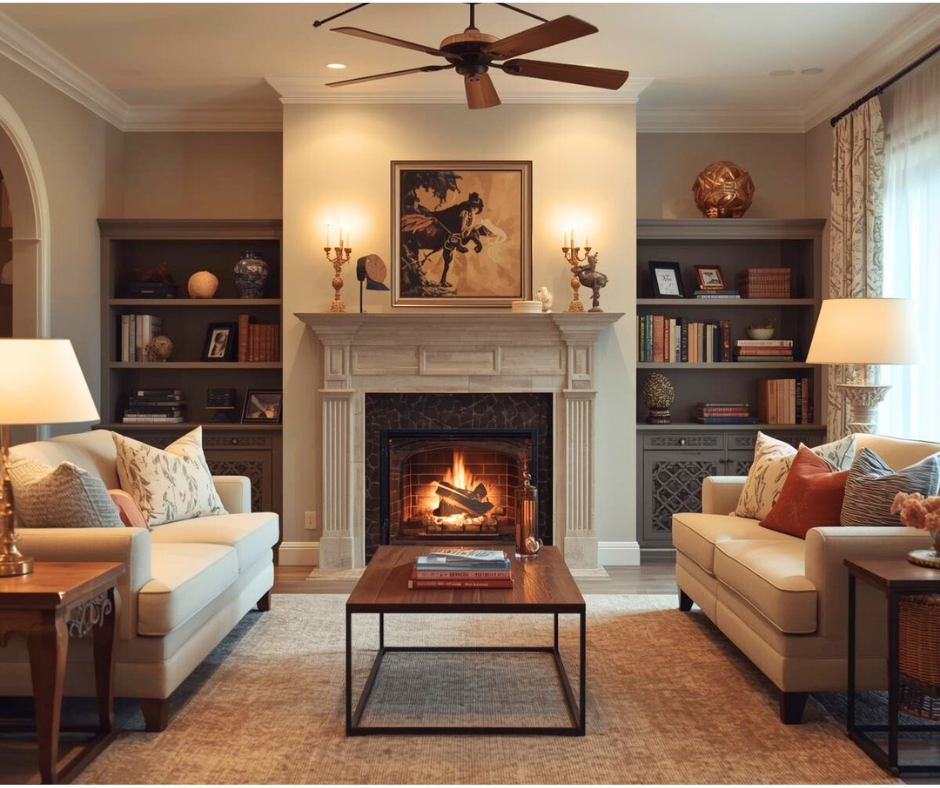
1. Visual Clutter That Never Goes Away
One of the biggest reasons a home can feel stressful rather than calming is visual clutter.
When countertops, tables, and floors are filled with too many objects, the eye never gets a chance to rest. Even beautiful items can create overwhelm if there are simply too many of them.
Take a little time to clear surfaces:
Simplify kitchen counters
Edit what’s sitting on coffee tables or entry tables
Remove extra items from the floor
Tuck away things you don’t use daily
The goal isn’t to remove personality—it’s to create breathing room for the pieces you love to stand out.
2. Awkward Furniture Layouts
Sometimes a room feels uncomfortable simply because the furniture isn’t working with the space.
A helpful trick is to do a quick sketch of your room on paper and play with furniture placement from a bird’s-eye view. Seeing the layout this way often reveals solutions that aren’t obvious when you’re standing inside the room.
Over time we tend to collect furniture and keep adding pieces without asking:
Does this actually improve the room?
Or am I just filling every available space?
Sometimes removing a piece—or rearranging what you already own—can completely change how a room feels.
3. Poor Traffic Flow
Good design should feel effortless to move through.
You should be able to walk easily around furniture without squeezing through tight gaps or bumping into corners.
A few simple guidelines help:
Leave comfortable walking space between furniture pieces
Ensure enough distance between sofas and coffee tables
Keep pathways open so movement through and around the room feels natural
When a room flows well, it instantly feels calmer and more welcoming.
4. Hard Surfaces That Need Softening
Kitchens and bathrooms often have a lot of hard surfaces—tile, stone, cabinetry, and fixtures. Without balance, these spaces can feel a bit cold or sterile.
The solution is to layer in softness.
Consider adding:
Area rugs
Simple window treatments
Countertop lamps
Plants or greenery
These touches soften the space visually and make it feel warmer and more inviting.
5. Hardware That Feels Builder-Grade
Think about the things you touch every single day:
Door knobs
Cabinet pulls
Faucets
These small details make a bigger impact than most people realize. Updating them with high-quality fixtures can elevate an entire room.
One design trend I love, that’s here to stay, is mixing metals.
For example:
A polished nickel faucet
Paired with brushed brass cabinet pulls
Mixing metals adds depth and personality while avoiding that uniform “builder-grade” look.
6. The Little Repairs We Learn to Ignore
Over time, many of us go blind to small imperfections in our homes.
Tiny drywall cracks, gaps in trim, or worn paint can slowly make a space feel unfinished.
But a quick refresh can make a dramatic difference:
Fill drywall or trim cracks with caulk or filler
Touch up trim paint
Repair small scuffs or dents
These small improvements bring a surprising sense of polish and completion to a room.
7. Area Rugs That Are Too Small
This is one of the most common design mistakes I see.
A rug that’s too small can make a room feel disconnected, as if all the furniture is floating separately rather than belonging together.
A good rule of thumb:
Choose a rug large enough that all the furniture in a grouping sits on it, or
At least the front legs of sofas and chairs rest on the rug
Larger rugs help anchor the room and instantly make the space feel more cohesive.
8. Artwork Hung Too High
Artwork is often hung far too high on the wall, which can make it feel like it’s floating in space.
Instead:
Hang artwork closer to your eye level, or lower
Place it 6-8 inches above a console table or sofa
You can also create more visual interest by layering elements together:
Artwork on the wall
Books or objects on a console
A vase or plant in front
You don’t want every item to stand alone—layering creates a more natural, collected look.
9. Window Treatments That Don’t Work With the Window
Window treatments can make a room feel finished and intentional—but they’re often hung too low or too narrow.
Instead of placing drapes directly above the window frame, try hanging them:
Higher on the wall
Wider than the window
This allows the drapes to sit to the side when open so they don’t block natural light. The result makes windows appear larger and the room feel more spacious.
10. Relying Only on Overhead Lighting
Many homes, especially newer ones, are wired primarily for overhead lighting. While it’s practical as in your kitchen, it’s actually one of the least calming types of lighting in a home.
Overhead lights tend to feel harsh and flat, which can make a space feel more like a workspace than a place to relax.
The secret to creating warmth and comfort is layered lighting.
Try incorporating mid-level and low lighting throughout your home:
Table lamps on side tables
Floor lamps in dark corners
Small lamps on bookshelves
Directional lighting to highlight artwork
Soft lighting on kitchen counters or buffets
Lighting different areas of a room at varying heights instantly changes the mood. Instead of one bright light flooding the entire space, you create pockets of soft glow that feel welcoming and calm.
One of my favorite tricks is simply lighting the corners of a room. It adds warmth, depth, and a sense of intention that overhead lighting alone can’t achieve.
When layered lighting is used well, a room doesn’t just look better—it feels better. This is particularly important when living in Alaska with our longer dark winters.
Our Homes Are Always Evolving
Here’s the truth: our homes are never truly finished.
Mine certainly isn’t. In fact I am regularly working on all of these things that I’m sharing with you here, particularly decluttering surfaces…..how does all that stuff build up so quickly?!
Every once in a while, it helps to walk slowly through your home and notice the spaces that don’t feel quite right. Ask yourself if one small adjustment could bring more calm, comfort, or cohesion.
Because your home should feel like a place that welcomes you,
a place that holds you at the end of a long day and embraces you like a hug.

The Drapery Trick That Makes Your Windows Look Bigger (and Your Rooms Taller)
Looking to refresh your living room or bedroom without a full remodel? Discover how strategic drapery placement can elevate your space. In this post, we cover why hanging your curtains high and wide makes a big visual impact, how to choose the right rods and fabric, and why light, natural drapery is often the foolproof choice. Whether you're staging to sell or simply want a lighter, brighter look—these tips will help your home feel more open and inviting.
When it comes to making a space feel open, airy, and elevated, few things work harder than well-placed drapery. But here’s the secret—it’s not just about the drapes. It’s how you hang them that makes all the difference.
Let’s talk about how to use drapes not as window coverings, but as framing tools to enhance your windows and elevate your room.
✨ It’s About Framing, Not Covering
Drapes don’t have to block out light or hide your view. In fact, I rarely use them as the main window covering at all. For privacy or light control, I recommend simple roller shades or blinds. Drapes are where we get to play with softness, height, and visual texture and warmth in the room.
Use them to highlight your windows—not hide them.
📏 Hanging Tips That Make a Big Impact
Here’s how I like to hang drapes for that tailored, airy feel:
Hang them high – Mount your rod as close to the ceiling as possible, not just above the window frame. This draws the eye upward and creates the illusion of more height.
Go wide – Your drapes should hang mostly outside the window frame, not covering it. This lets all the natural light in and makes your window feel grander.
Let them kiss the floor – Not too short, not overly puddled. Just grazing the floor gives a clean, elegant look.
This combo—high and wide—is a simple visual trick that transforms how big your windows (and your room) feel.
🎨 What Color Should I Choose?
You can absolutely go bold with drapery color if the room calls for it. But if you're looking for a foolproof, classic approach?
Go with white or cream in a soft, natural fabric—like a linen or cotton blend—that blends with your wall color. This keeps the focus on the light, keeps the room feeling open, and works with nearly every style.
Darker or bold-colored drapes can work beautifully when thoughtfully chosen—but they tend to draw attention and visually divide a space. If you're unsure, light and neutral is always a safe and sophisticated option.
🖤 Don’t Forget the Hardware
The rod matters just as much as the drapes themselves. Look for a solid, substantial rod—at least 1.5 inches in diameter—to create a polished, grounded look. Thin, flimsy rods can cheapen the effect and visually sag over time, especially with longer panels.
Good news? You don’t have to spend a fortune. There are some fantastic linen-blend drapery panels and solid rods available on Amazon that look high-end but are totally budget-friendly. With the right choices, you can transform your windows without blowing your budget.
Window treatments can be intimidating—but they don’t have to be. Stick with clean roller shades for functionality, and use drapes to add softness and style. With a few placement tricks, you’ll make your windows feel larger, your ceilings higher, and your space more serene.

Office Perk: Inside Our Custom Coffee Nook Transformation
What started as an underused closet is now the most-loved spot in our office. See how we transformed it into a cozy, custom coffee nook—complete with floating shelves, floral wallpaper, and thoughtful design details.
From Closet to Coffee Corner: A Real Estate Office Refresh
Sometimes, the most inspiring design moments come from reimagining what’s already there. At our Story Real Estate office, we had a small closet that was doing housing some file storage along with a catch all for general ‘stuff’. Tucked off to the side of a hallway from the main office space to two agent’s offices, it was easy to overlook. But I saw potential—a chance to create something both beautiful and useful. And so, the coffee bar was born.
Making It Functional
First, we removed the closet's sliding doors to open up the space and invite attention. The tile floor was replaced with carpet squares to match the rest of the office—creating visual flow and cohesion.
Since this closet was originally built as a laundry space (back when this building was a residential home), we brought in a plumber to rework the plumbing. That allowed us to add a narrow sink—perfect for rinsing mugs or filling a kettle without crowding the workspace. We also added an under-counter beverage cooler, which keeps our drinks and coffee creamer cold and close at hand. Practical and polished!
We had an electrician install new lighting, and I selected brass hinge-arm sconces to spotlight the shelving and add a warm, welcoming glow, plus they played off the warmth in the floating shelving.
Layering in Beauty
I found the perfect custom white oak floating shelves online, which add both storage and style. Below, I ordered cabinetry in a rich black stain from the Cabinet Crew—complete with drawers, a lower cabinet, and that handy pull-out trash bin for both trash and recyclables.
We topped it all with a custom solid surface counter in a white lightly speckled finish that ties the entire setup together with a clean fresh look.
The Showstopper: Wallpaper Over Tile
At first, I considered tile for the backsplash, but ended up choosing a large-scale black and white floral wallpaper instead. It was more budget-friendly, but it also delivered the exact drama I wanted for this little nook. Wallpaper can be intimidating—especially since I could not find a local installer here in Homer. I handed the job over to my contractor, who was a good sport and willing to give it a go, and I’m so glad I did. A forgiving pattern helped make the install smooth, and the result is truly a focal point.
Framed to Shine
To really frame the space and give it more presence, I added trim around the entire nook for an architectural feel. Then I painted the ceiling and trim in SW Iron Ore, a rich warm black tone in semi-gloss. The contrast is moody, modern, and just the right amount of bold.
A Small Space with a Big Impact
What was once an overlooked closet is now one of the most complimented spots in our office. It’s not just a place to make coffee—it’s a little moment of beauty in the workday, a place that invites connection. Stop in any time and visit the Story Team, they’d be happy to make you a cup of coffee and visit.
See the before and after images below.


How to Shop Your Own Home: A Fresh Take on Styling with What You Already Have
Looking to refresh your space without spending a dime? Learn how to shop your own home with simple tips that help you rearrange, reimagine, and restyle using what you already have.
One of the most transformative (and budget-friendly!) design tools we love at Storied Interiors is the simple act of shopping your own home. Before heading out to buy something new, we always encourage clients to take a fresh look at what they already own. You might be surprised by the beautiful pieces waiting to shine in a different room. Whether you're looking to refresh a tired corner, change the vibe in your living room, or just fall back in love with your space, here's our step-by-step guide to reimagining your home with what you already have.
Step 1: Clear the Space Start by removing all accessories and taking down artwork in the room you want to refresh. This gives you a blank slate to see the space with fresh eyes. It might feel a little bare at first, but that's the point! Letting the room "breathe" helps you see possibilities instead of just the current setup.
Step 2: Rethink the Furniture Layout Now's the time to play with arrangement. Ask yourself: does the current furniture placement serve the way you actually use the room? Is there something too bulky or not being used that could be swapped out? Don't be afraid to "borrow" from other parts of your home. Maybe that spare bedroom chair would look perfect in your living room, or the dining area could use a beautiful old dresser for extra storage and character.
Step 3: Curate Your Art With the furniture in place, look at your artwork with new eyes. Consider bringing in a piece from another room or hanging things in unexpected ways. You might even discover that a favorite print you’ve had in the hallway deserves a spot in the spotlight. (And stay tuned for our upcoming blog post with smart, stylish tips for hanging art!)
Step 4: Layer in Accessories Thoughtfully Now for the fun part: pillows, throws, lamps, vases, and small decorative items. Bring pieces back into the space slowly, choosing only what adds beauty, function, or a sense of joy. You might find that leaving a surface a little more open actually gives your space a fresh, simplified feel.
Step 5: Bring the Outdoors In Don’t forget to step outside and see what nature has to offer. A bowl of beach rocks or seashells, a sculptural piece of driftwood, or a few fresh-cut wildflowers in a vase can bring organic beauty and a sense of place into your home. Even a few stems can make a stunning statement.
Step 6: Edit and Enjoy Don’t feel like you need to use everything. This is your chance to be selective and intentional. What makes the space feel good? What no longer fits? Styling your home is a creative process, and editing is a powerful tool.
Shopping your own home is one of the easiest ways to refresh your space without spending a dime. It’s sustainable, personal, and surprisingly inspiring. So take a look around—you might already have everything you need for a whole new look.
Have you ever tried shopping your own home? We’d love to see your before and afters!
Want more styling inspiration? Follow along at @storiedinteriors for design tips and before-and-afters from real homes here in Homer, Alaska.
Selling a Home While Raising a Family: How to Stay Ready and Sane
Discover how to keep your home feeling lived-in yet show-ready while it’s on the market. Simple tips—like packing away nonessentials and creating a streamlined space—can make a big difference, especially for busy families.
Selling your home can feel overwhelming, especially when you’re still living in it—juggling daily life, kids’ activities, and unexpected showings. But with a little planning, you can keep your space ready to impress potential buyers while staying comfortable and sane.
Here are some simple steps to help you live in your home while staying show-ready:
🏡 1. Pack Away the Nonessentials
Start by packing up anything you don’t use daily or weekly. Think seasonal clothes, extra toys, small appliances, and rarely-used decor. Not only will this declutter your space for showings, but it will also give you a head start on packing for your move.
🌟 2. Create Designated “Living” Zones
Set up easy-to-maintain zones in your home. For example, give kids a specific area for their toys (and pack the rest away). In the kitchen, limit what stays on counters to just a few essentials that you use daily. This makes tidying up before a showing quick and manageable.
✨ 3. Develop a “15-Minute Tidy” Routine
Create a daily routine that everyone can help with—like wiping counters, fluffing pillows, and sweeping floors. Assign age-appropriate tasks to kids so everyone feels involved. This way, you’re always 15 minutes away from a showing-ready space.
📦 4. Keep Packing Supplies Handy
Have a couple of empty bins or baskets ready to toss stray items into before a showing. It’s an easy way to scoop up clutter at the last minute.
🗓️ 5. Keep a Flexible Schedule
Showings can pop up unexpectedly, so aim to be flexible. Keeping things tidy and packing up extra stuff will help you stay calm when that call comes in.
💡 Bonus Tip:
Label packed boxes clearly and store them in a garage, basement, or rented storage unit to free up living space and make the move easier later.
Selling your home doesn’t have to mean living in constant stress. By packing away nonessentials, creating manageable routines, and involving the whole family, you’ll be ready to impress buyers at a moment’s notice—and ready to move forward when the right offer comes along.